Drop pods are deceptively large models and it took quite some time to get this model ready for priming. The digital camo scheme was done with styencils from Anarchy Models. There is a good tutorial on Beasts of War which can be seen here.
I have an urban theme for the bases of my Sauroters army but I didn’t want to do a grey digital camo. I wanted something a bit more mediterranian so I went with Tamiya Olive Drab (TS-28) and Tamiya Wooden Deck Tan (TS-68). The light green is Highlight Russian Tank Crew II (70.330), which is also the highlight color for Sauroter power armour.
I contacted Anarchy Models to ask if I could use rattlecans with their stencils. They recommended car primers rather than the Tamiya line. This is because the Tamiya cans have quite a heavy flow. You tend to get a ridge building up at the edge of layers. I didn’t mind that but if you were doing a lot of weathering it might be a problem.
The doors were a little tricky to fit. Three fit fine, one is almost perfect and one is a bit reluctant to fully close. I can live with it. I think I could have gotten a better fit if I have assembled it before painting but that would have made the painting process really difficult.
I enjoyed assembling and painting this kit a lot more than I though I would. In fact, I’d really like to do a Dreadclaw. Maybe in a future project. Incidentally this is the first model I’ve posted in a hobby Facebook group. The post can be seen here
After a mammoth four day session I have assembled and primed all three tactical squads. I enjoyed doing it but I am also glad it’s over. After all this cutting, sanding and gluing I am really keen to get back to painting. As I mentioned in an earlier post I am modeling the sergeants and specialists with a single weapon option. Chainsword and plasma pistol and plasma gun respectively. They are intended to be WYSIWYG.
That said, the MKIII marines were modeled with chainswords. This is because the Burning of Prospero sprus come with 10, so I thought I’d use them. The marines are all equipped with a combat blade (or sword), grenades and ammo pouches.This makes them quite bulky but I would expect them to be heavily equipped. This also fits my counter insurgency theme.
After looking at them for a while I decided I didn’t like the chainswords on the MKIII marines. They were too big and awkwardly mounted. What really finished it for me though, was the handles. They are modeled with a kind of tab which is how they attach to the belts. Mounted behind the shoulder these tabs had nothing to attach to and would have looked weird when painted.
I wanted to keep the theme of combat blades consistent so I went back to my first squad of tactical marines and removed the 3D printed kopis. A couple broke during the process but that can’t be helped. They actually fit quite well on the the MKIII armor, so no filing was required.
The MKIV and MKVII marines have more conventional combat blades. There is an issue with fit though. I wanted the blades to be mounted behing the shoulder. They don’t fit. Particularly in the case of the MKIV blades. So, I had to file down the back of the torso with a square file to make space. I also had to position the handles to take advantage of the gap in the backpacks between the main unit and the exhaust.
The poses are fairly static due to all the extra bits like pouches limiting articulation. But I like how they look as a group. The MKIII marines look particularly brutal. The most difficult part of assembly was fitting the two parts of the MKIII backpack. It’s difficult not the leave a gap or inadvertently cut into the model while cleaning.
The models are preshaded with Tamiya Dark Grey and then a zentithal layer of Tamiya Light Grey undercoat. I really do think preshading makes a big difference if you can keep your paint layers really thin. The next step will be basecoating. That will be an even bigger job than assembling and priming.
So, having completed forty models and various parts I am no closer to my goal of a full battle demi company. This is due to the fact that thirty of the the forty are Ultramarines and the 10 Sauroters are not quite up to the standard I want. That said, I have learned how to assemble, model, convert and paint to a standard I am satisfied with so I’m now ready to tackle the project. So I’ve made a plan.
The first step was to buy the models I need. From ebay sellers I purchased four tactical squads. Two Betrayal at Calth sprues, one Burning of Prospero sprues and a MKVII sprue. I also bought an Assualt Squad sprue. That gives me enough models for 3 10-man tactical squads, 2 5-man Devastator Squads, 1 Assault Squad and a 5-man Command Squad. The Command Squad was put together by kitbashing leftovers from the sprues plus 5 sets of legs from my original Ultramarines Devastators.
The next step is to clip all of the parts off the sprues and group them into individual sets. As I have mentioned before, I want to be as WYSIWYG as possible. So, I will also need to supplement the sprues with parts from my bits box. The goal is to have a small baggy for each model containing each of the bits required to build it. For models like sergeants, this will include all of the weapons options. The leftover bits will go into my bits box.
Next I’ll need to clean up all the parts. I have heard several people mention how good the GW seam scraper is. I can use a knife just fine but it is a little dangerous and there is always the possibility of cutting into the miniature so I might get one. I am also going to get some Vallejo plastic putty for gap filling, particularly on the jump packs.
After that comes the modelling. I like to use sub-assemblies so I won’t be fully assembling my miniatures. I’ll be leaving the backpacks, helmets and arms carrying weapons of the bodies. These will be mounted on skewers for undercoating. I’ll also need to do the magnetization at this stage. Arms for the sergeants and hands for the special weapons guys. I’ll also be drilling all the barrels on all the weapons.
Everything will be primed with a Tamiya undercoat. I am planning to preshade the miniatures by first priming from below in black and then from above in grey. If I can keep subsequent layers thin, I should be able to achieve a decent look. Preshading is subtle but really does add something to the finished product if subcequent layers are thin.
Painting will be done in batches. I have noticed that I tend to get frustrated and sloppy if I paint for too long. What should be a hobby becomes a chore. My satisfaction really depends on a good result so I will be painting in small batches of 5 for miniatures and 10 for sub-assemblies. I am going to limit myself to one batch per session and concentrate on getting the best result possible.
The final step will be basing the models. As I mentioned in a previous post I’ll be using a base stamp and green stuff for basing. With the assault marines I’m planning to use transparent acrylic bases with black painted rims. I haven’t decided what color to paint the rims of the plastic bases but it will probably be black or grey. Everything will then be varnished with two coats of Tamiya Flat Clear.
One of the more important and expensive choices for the hobbyist is what kind of paints to buy. Back in the day I had some GW paints. I disliked the white rubber tops. I found that the hinge tended to break and the lids became encrusted with dried paint. When I got back into the hobby I discovered that they weren’t the only game in town.
The majority of my paints come from the Vallejo range. I really like the dropper bottles. Not only do they contain more paint than the GW pots, there is less wastage. I can control how much paint I put on my palette easily. For the same reason it’s easier to mix paints too. Also, the dropper design exposes less of the paint to the air, keeping the bottles cleaner and the paint viscous.
Initially I bought a small number of paints. I wanted to be able to paint a full range of colors but not have to buy too much up front. I started with some vauge notion of being able to mix colors from the primaries and did some research. The best guide I found was on theback40k. That site recommended the following as a good (GW) starter set:
Blood Red
Blazing Orange
Sunburst Yellow
Snot Green
Ice Blue (a light cyan)
Ultramarine Blue
Liche Purple
Warlock Purple
Also black and white. I simply used a conversion chart and bought the Vallejo equivalents. I can honestly say that this was a great starter set. But what to add next? Here is what I suggest:
Metallics
Browns
Greys
I quickly added some metallics to my collection, although for smaller scales like 15mm, I’ve read that non-metallic metallics are better. Using grey for steel and yellow for gold etc. I bought the Vallejo Model Air set. It contains:
Silver
Steel
Gold
Bright Brass
Copper
Blue Metal
Gun Metal
Black Metal
The quality is great although I do recommend using medium rather than water if you want to dilute them. Although, they are very thin paints so you shouldn’t need to thin them much. I really like the Bright Brass and Black Metal colors. I have used them extensively on the Sauroters project.
As for browns and greys, they are just really useful. Especially browns. Used as undercoats they give a lot of variety to the same colors. The greys help you to desaturate colors. This can be aceived with black and white but having greys make consistent mixing easier.
Washes are great too. I’ve heard them described as liquid talent. They certainly help a lot. Black and brown are all you need to start with. You can use other products like oil paint or woodstain to wash miniatures but if you are a beginner I’d recommend acrylic washes.
I also like glazes. They stay on top of a surface, contrary to washes which seep into the recesses. Glazes help blend colors together giving a smoother overall blend. They are not essential but are very useful. It’s worth getting say a green glaze, if you are painting a lot of highlights on a smooth surface, say power armour. Not worth getting if you are a complete beginner. Stick with the washes.
I have tried some of the GW Technical paints. Specifically the Martian earth paint and Lhamian Medium. They are a lot of fun but I don’t have much use for them at present. I may get some if I have a particular project I want then for in the future. Again, probably not worth it for the beginner.
All in all, for the beginner I’d recommend the 10 paint starter set above with a black wash, a brown wash and a steel, bronze and gold metallic. That should cost about 50 Euro in total. Not cheap by any means but about as reasonable as it’s going to get. You should be able to paint just about anything with it.
When I was researching about paints I spent a lot of time thinking about agitators (e.g. the little steel ball in rattle cans). Eventually I settled on glass beads. Once you start using up the paint they become very effective. The sound is also oddly satisfying.
Daiso is a chain store in Japan. One of the various 100¥ shops that are ubiquitous here. While you certainly get what you pay for, the quality is decent enough and they have everything under one roof. When I got back into the hobby I was able to get everything I needed quickly and cheaply. Perfect for someone who doesn’t want to spend a lot, or not sure if they want to yet.
So, what exactly did I get? Well, all the basics:
Paintbrushes
Glass jars
Hobby knife
Hobby pliers
Hobby files
Cutting mat
Hand drills
Super glue
Rattle cans of paint for priming
Rattle cans of varnish
Plastic baggies
Ziploc bags
Storage boxes
This meant that the only specialist items I needed were plastic cement and paint. As I learned a little more about painting and modelling I was able to pick up a few more useful items from the same shop:
Sanding sticks
Makeup sponges
Tweezers
Masking tape
Sheets of cork (for basing)
Sandpaper (for urban bases)
A year in I would still buy any of those things, bar a couple, again. I think it’s worth paying for a quality varnish spray, I use Tamiya. I also use Tamiya’s grey primer. It’s better quality than a general purpose rattle can, but the ordinary stuff is perfectly acceptable. The drills were fine but investing in a good quality hobby drill like the GW drill, or an electric drill is a good idea. You also need a good quality hobby knife, I use OLFA brand knives. Other than that, why pay more?
So what’s next? Well, I would like to get a razor saw and mitre box. I would like to build some terrain at some point and I am sure they would come in handy. I’d also like a razor saw for converting. At the moment I use a hobby knife and I just can’t get good straight cuts with it.
I really like the sculpt on the backpacks. I imagine the bars as space batteries of some kind. So I wanted a very utilitarian look. I basically brybrushed Vallejo Metallic Grey over the same color washed in GW Nuln oil. I finished with an edge highlight of Vallejo Air Silver.
I tried a kind of heat distortion effect on the barrels of the las cannons. I followed part of a tutorial from Warhammer TV, which can be seen here (from 18:24). The base color was Vallejo Air Silver washed with black then tidied up again with silver. I thinned down some vallejo blue ink and applied a thin band with a flat brush. I then applied an overlapping band of purple ink (mixed from GW red and Vallej blue inks). Finally I applied another overlapping band of GW Seraphim Sepia.
I am fairly pleased with the effect. I think the GW inks are much better than the Vallejo blue ink, which dried patchy. I was a little heavy handed, especially with the purple. Next time I’ll try to be more patient and build up the color with several layers.
I want the cables to be a jumble of different colors but still try to keep within my analogous paint scheme. I want to try doing a black and yellow striped cable but I can see that being a really frustrating procees so I’ll see how it goes. I will leave shaping the resin until after everything else is painted. So, I will be painting them after the armor is finished and everything is glued into place.
I am planning on using these models as tactical marines rather than Devastators. I will be using the classic las plas squad inside a rhino combo.
I really like the paining aspect of the hobby so I tend to break models down into sub assemblies. It makes batch painting more enjoyable and less frustrating. It’s so much easier to edge highlight a helmet without a body getting in the way.
I have chosen to paint the helmets blue, partly for variety and partly for fluff reasons. The Sauroters are an Ultramarine successor chapter and that’s how the Ultramarines do it. Also, I like paining blue and it fits with my analogous color scheme.
This is actually the second attempt at these helmets. The first was OK but the blending on the tops of the helmets and the eyes weren’t good enough so I stripped them and started again. Second time around however, I over sprayed the undercoat and cloged some detail on some models. Nevermind; next time.
While I was paining I found the Vallejo Ice Blue really thin. To the extent that it was hard to paint with. I tried shaking it real good but to no avail. I considered thickening it on the pallette by using dry retarder but decided I should probably try to just fix the problem. I tried using a glass bead as a paint agitator. It seemed to do the trick.
As always the eyes drove me nuts. The best method for me seems to be basecoating and shading as normal and then adding a thin line of white. This needs to be thinned down with some medium. Then a glaze over the top. I find it impossible to do anything else consistently or well.
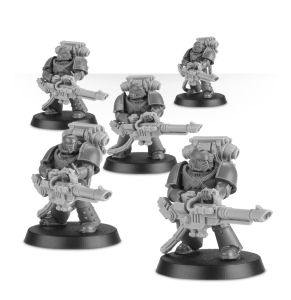
I am using 30k Tactical Marines from the Betrayal at Calth boxset. This is because I have bought some resin heavy weapons from Forgeworld. The static poses suit the heavy weapons and I much prefer the MKIV marines to the MKVII devastators. I like the crenelations on the latter’s armour but they are just too ostentatious, the weapons in the box set look stupid and there are only five in a box.
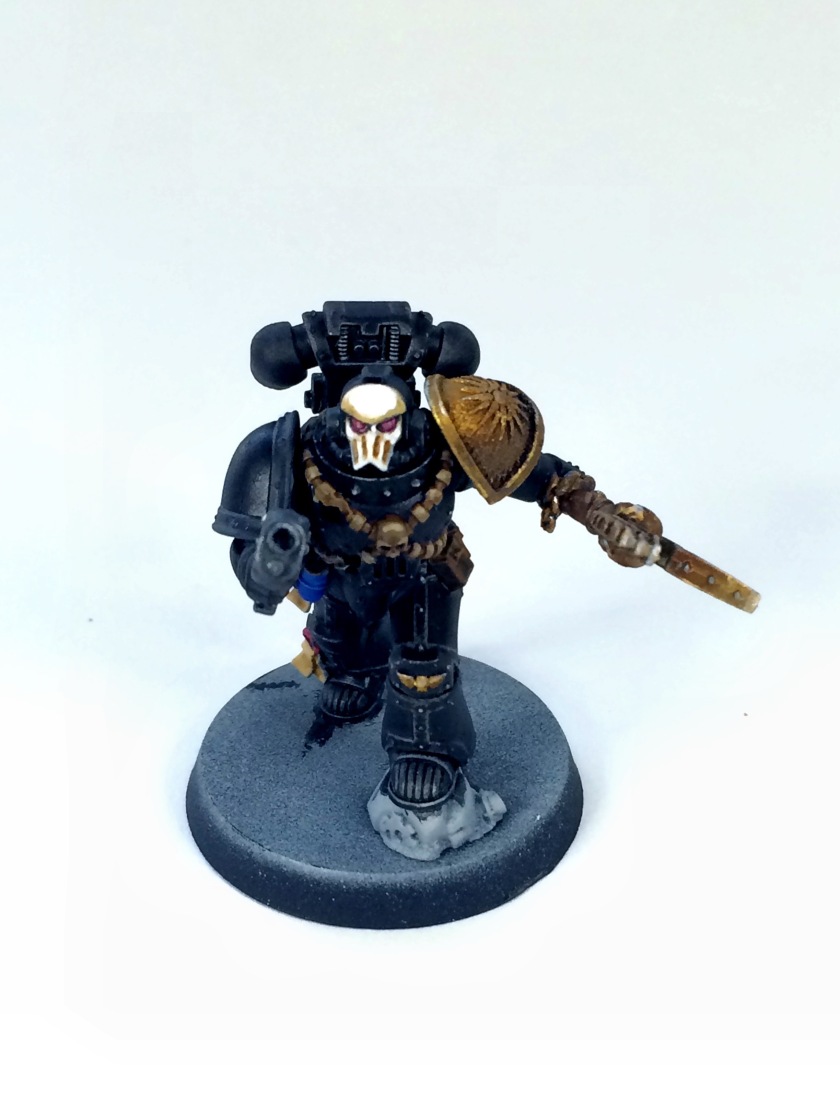
The body of the model is from the Deathwatch: Overkill boxset.
The helmet is from the Betrayal at Calth boxset.
The jump pack is from the Vanguards Veteran set.
The left shoulder pauldron was a custom order from a Shapeways seller.
The backpacks are magnetized using 1 x 3mm rare earth magnets.
The right arm is from the Betrayal at Calth boxset.
The plasma pistol is from the Tactical Squad boxset.
I found converting the backpacks relatively easy. I used two magnets for the backpack and three for the jump pack. I find the easiest method is to drill a hole and glue the first magnet. Usually this is the magnet in the body of the miniature. Next, I put the second magnet on the first and drill the hole in the secondary piece. Then, I apply glue to the second magnet using a cocktail stick. Finally I offer up the secondary piece to the second magnet. When the glue is dry I can pull the pieces and the magnets apart. This way the magnets will sit flush and I am less likely to get the polarity wrong.
Painting
The basic scheme is black. I went about it by applying very watered down coats of black over grey primer. Detail which then showed through was either left as it was or picked out in GW Eshin Grey. The armour was then tidied up with Vallejo Game Colour Black.
Armour ~ Vallejo Black (), highlighted with Eshin Grey
Left pauldron ~ Vallejo xxxx ()
Plasma Pistol~ Vallejo Black Metal (71.073), washed with GW Nuln Oil, highlighted with Vallejo Gunmetal Grey (71.065)
Crozius Arcanum ~ Vallejo Brass (), highlighted with Vallejo Gold () and Vallejo Silver()
Leather~ undercoated with Vallejo Cammo Black Brown (), washed with GW Agrax Earthshade and Highlighted with Vallejo Flat Earth () mixed with white.
Book~ Vallejo Hull red (). Washed with GW Carrobourg Crimson and highlighted with Vallejo xxxx ()
Eyes ~ Vallejo xxxx () sheded with GW Agrax Earthshade.
Overall I’m pleased with the result. I particularly like the way the handle of the Crozius Arcanum came out. It looks like soft leather. I regret not spending a bit more time and care on highlighting the wings of the Crozius Arcanum though. I feel I could have done a better job. I’m also not satisfied with the eyes. I have since developed a method I’m happy with, when I was painting this model I couldn’t do anything I was satisfied with so I just did almost solid red.
I have decided to make it a rule not to go back and add anything once a model is varnished. I’d prefer to just try to improve on the next model. In this way I hope to see a solid progression in the quality I can achieve. It’s also motivating to try and get it right the first time. I rushed through the Crozius Arcanum because I was tired and wanted to get it finished. I would have been better off simply stopping and picking it up another day. It’s a hobby after all and should be relaxing not stressful.
You’ll notice that it is not based yet. I am not planning to base anything until the whole army is finished. I want to try an achieve a consistent look and I really haven’t decided how they’ll be based yet.
Also, I haven’t painted the detail he is standing on. Partly this is because I haven’t decided on a basing scheme but mainly because I will probably cut this piece away. I want to have a base where he is running up stairs. This should give a more dynamic look. Especially with the jump pack attached. It will also break the monotony of all the HQ choices having one leg up on something.
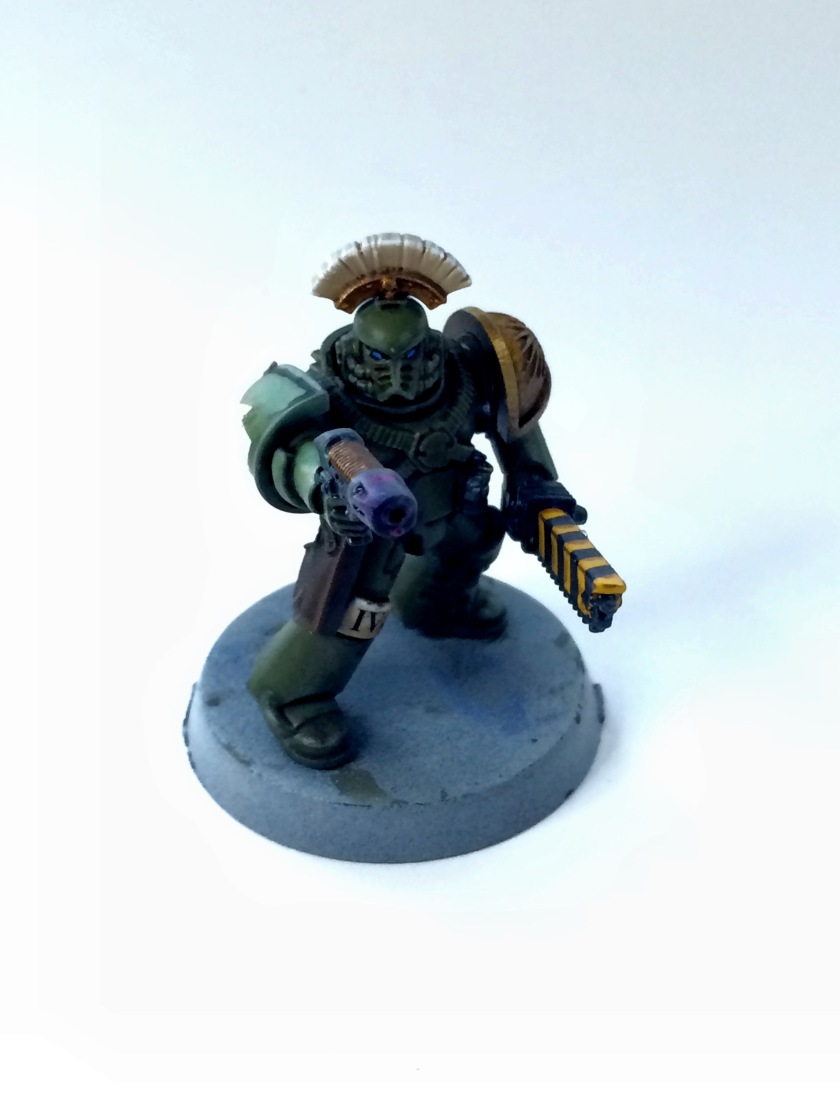
Here are some pictures of the first troops choice for my Sauroters Chapter Battle Demi Company:
Design
I have placed the squad number on the right knee plate. In the 30K fluff this is where the Legion number is displayed but that doesn’t make sense to me. It seems more reasonable that the limited space for markings would be better used for a squad marking. Especially as the Chapter Symbol is already displayed on the left shoulder paulron. So, color denotes the Company and the numeral denotes the squad. I will carry on the theme with subsequent squads.
Modelling
The left shoulder pauldrons were a custom order from a Shapeways seller.
The combat blades, mounted behind the shoulders, are Kopis. They were a custom order from a Shapeways seller.
I found the converting a bit easier this time around. I have a bit more experience working with plastic and resin. Also, I found the 30K marines a lot easier to work with. Mainly because of the wrist armour which provides a lot of surface area for gluing. I have also taken to applying super glue with a cocktail stick which is much more controllable. I also invested in an electric drill which made drilling out barrels etc. much easier and consistent.
Painting
The basic scheme is green with copper. Blue is an accent color and is used on the eyes and some of the grenades. The squad was batch painted to what I think is a decent tabletop standard. It took a fairly long time but that’s fine. Painting is a hobby for me. I think any subsequent squads will be probably be painted much quicker.
I experimented with pin washing, that is I applied Agrax Earthshade over a gloss varnish coat. I like the effect but it didn’t work particulalrly well. The flow of the wash was insufficient and I pretty much rushed through. Also the pin wash was the last in a lot of layers so detail may have been clogged. Next time I will try with thinned oil paint.
Armour ~ Panzer Aces Russian Tank Crew (326). Highlighted with Panzer Aces Russian Tank Crew Highlight (330). Glazed with GW Waywatcher Green.
Left pauldron ~ Vallejo Brass (70.801)
Bolters ~ Vallejo Black Metal(71.073). Drybrushed with Vallejo Steel (71.065)
Holsters ~ Vallejo Air Cammo Black Brown (71.042). Drybrushed with Vallejo Flat Earth (70.983)
Kopis ~ Vallejo Brass (70.801). Washed with GW Agrax Earthshade
Eyes ~ GW Agrax Earthshade. Vallejo Deep Sky Blue (70.844).
Right knee pad ~ Vallejo Khaki (70.988). Highlighted with Vallejo Iraqui Sand (70.819)
You’ll notice that they are not based yet. I am not planning to base anything until the whole army is finished. I want to try an achieve a consistent look and I really haven’t decided how they’ll be based yet.
Decals
As usual, I had a bit of trouble with the decal. I want to have a consistent command squad marking for my HQ choices. This replaces the embossed iconography that is very common with GW and Forgeworld. I have seen coflicting advice (icluding on the Vallejo website) about the order in which to use Decal Medium and Decal Fix. It took a couple of attempts to get right.
I started by applying a thin coat of GW ‘Ard Coat to the surface I was applying the decal to. Once it was dry, I applied a small amount of Decal Medium to the surface. I softened the decal in clean water for about 30 seconds. I positioned the decal and then covered it in a thin coat of Medium. Once it was completely dry, I applied Decal Fix and left it to dry overnight. Finally I sealed the decal with matt varnish.
I am very pleased with the overall result but there are a few things I’d like to improve. I had a lot of difficulty with the eyes. I don’t particularly like the finish but it’ll do. I realized too late that I should have started by painting the eyes. It would have been much easier. I also went a bit overboard on weathering the squad markings on the shoulder pauldrons. I was having fun and just got carried away.
My biggest regret is deciding to add the kopis after I have finished painting the models and had varnished them. The gluing didn’t go well, the paint job was pretty sloppy and when I varnished them again, I ended up with slight frosting. They looked a lot better before I went back and started messing with them, so lesson learned I guess.
How to base miniatures is something that I have spent a lot of time thinking about. I still haven’t come up with a satisfactory answer. I have seen some really great themed bases. But when those themed bases, say a snow theme, is placed on a table top with a different theme, or an army with differently themed bases, the result is incongruous.
Sometimes IMHO, for example Death Korps of Kreig, people go a little overboard. A base drowning in mud distracts from the miniature. Sometimes, for example Salamanders, the bases don’t make much sense. Why would anyone stand on magma? Even in terminator armour. I want something that compliments, or at least doesn’t clash with, my color scheme. I also want something that makes sense fluff wise and will work with different tabletops.
I considered using clear bases with the rim painted black. The effect is striking but subtle. The problem is that clear bases are not much fun and so many miniatures come moulded with elements attached to their feet, you still have the same problem. Also, unless I pin the models to the bases, which might be very noticeable, they will snap off every time they are dropped. Also, I guess that the clear plastic will eventually pick up dirt and scratches, ruining the effect.
I considered buying some aftermarket bases. The problem is that I don’t really like what I have seen. Some of it is OK but for the price, I want to be a bit more excited about them. Also, scenic bases come in sets and most sets only have a few good bases and are pretty derivative in general.
So, given that this is a hobby, I think I’d like to make my own bases. That leaves me with the same problem of theme. In the future, I’d like to make some terrain and that will almost certainly be classic ruined city terrain. So, I think that, given the grimdark nature of the 40K universe, urban bases are probably the way to go.
Also, after this small Sauroters force is completed, I would like to collect some other factions. Specifically, the Genestealer Brood from the Deathwatch Overkill boxset and some Death Korps of Kreig. To round it out to four, I’d also like to create a Chaos warband. So, I’d like to have complementary bases for each faction.
The Genestealer Brood features a model with a very elaborate base; a Patriarch crouching on a pipe. So, a kind of Underhive, Necromundaesque theme seems appropriate. I want to paint the DKoK in a light blue WWI French theme. I’m imagining them as a kind of sinister UN style paramilitary force doing urban clearance. So, a war-torn city theme seems to fit. As, for the Chaos warband, I’m really not sure yet.
For my Sauroters I would like a dark color scheme for their bases. So, I think I’m going to go with stone. The kind of flagstones a fortress monastery might have. I am thinking black rather than grey and well worn. I have found a tutorial I like from Dr Faust’s Painting Clinic which can be seem here.